A Complete Guide to Karpenter: Everything You Need to Know
Bravin Wasike

Modern Kubernetes workloads need elasticity. Static node groups often waste resources or introduce bottlenecks. That's where Karpenter steps in.
Karpenter is an open-source autoscaler built by AWS. It dynamically provisions the right-sized compute capacity for your Kubernetes clusters based on real-time demands. Whether you're running workloads on AWS, Azure, or GKE, Karpenter simplifies cluster scaling while reducing costs and operational overhead.
In this comprehensive guide, we'll cover how Karpenter works, walk through real-world setup steps, share best practices, highlight limitations, and explore alternatives. We'll also discuss how DevZero can simplify your development environments by integrating seamlessly with Karpenter-backed infrastructure.
Let's dive in.
What Is Karpenter?#
Karpenter is an open-source Kubernetes autoscaler created by AWS. It automatically provisions compute capacity in response to unschedulable pods. This ensures workloads always receive the resources they need without manual intervention or complex node group configurations.
Key Features#
- Dynamic Node Provisioning: Instantly launches nodes tailored to pending pod requirements.
- No Predefined Node Groups: Simplifies infrastructure setup by eliminating the need for manual node group definitions.
- Intelligent Scheduling: Selects optimal instance types, zones, and capacity types (e.g., Spot and On-Demand).
- Cloud-Native: Currently, AWS (via Amazon EKS) is the only cloud provider officially supported by the Karpenter maintainers. While support for Azure and GKE exists through community-driven or experimental CRDs, these are not officially stable or maintained.
Unlike the Cluster Autoscaler, Karpenter does not require predefining node groups, making it faster, simpler, and more efficient. It intelligently selects instance types, zones, and capacity types like Spot and On-Demand to meet your pod's needs in a cost-effective way.
Karpenter is particularly effective in environments where workloads are unpredictable or highly variable. Its ability to provision nodes quickly without needing rigid node group definitions allows developers and SREs to reduce infrastructure toil and focus more on building applications.
Karpenter's NodePools define the constraints and behavior for the nodes that Karpenter can provision
How Does Karpenter Work?#
Karpenter works by monitoring the Kubernetes scheduler for pods stuck in a pending state — typically because there aren't enough available resources to schedule them. It then analyzes each pod's resource requests, affinity rules, and taints to determine the optimal computer resources needed, allowing it to dynamically provision the right infrastructure at the right time.
Karpenter Lifecycle#
- Detection: Karpenter monitors unscheduled pods in real time.
- Constraint Evaluation: It evaluates the pod's resource requirements, including CPU, memory, tolerations, affinity rules, and labels.
- Instance Matching: Using these constraints, Karpenter selects optimal instance types across availability zones, capacity types (e.g., On-Demand and Spot), and architectures.
- Provisioning: It provisions nodes using the cloud provider's API (such as EC2 for AWS).
- Node Bootstrapping: Nodes are initialized with the appropriate configurations and join the cluster.
- Scheduling: Pods are scheduled onto the new node as soon as it's ready.
- Deprovisioning: Idle nodes are removed after a defined TTL (time-to-live) to reduce costs.
How to Get Started With Karpenter: How to Install and Configure Karpenter on AWS EKS (Step-by-Step Guide)#
Getting started with Karpenter requires a combination of infrastructure preparation, permission management, and deploying Karpenter into your cluster. The following steps walk you through the process on AWS with EKS (you can easily replicate the same steps with other cloud providers). Each step includes the command, explanation, and reasoning behind it.
Prerequisites#
- A running EKS cluster (with access to its name and endpoint).
- IAM OIDC provider enabled for your EKS cluster.
- CLI tools installed: kubectl, awscli, eksctl, and helm.
- Sufficient IAM permissions to create roles, policies, and service accounts.
Step 1: Tag Your Subnets for Discovery#
Karpenter uses tagged subnets to know where it can provision compute resources.
In the code snippet above, replace the subnet IDs and my-cluster with your actual cluster name. This tag signals to Karpenter which subnets are eligible for node provisioning.
Step 2: Create an IAM Role for Karpenter#
Create a service account that Karpenter will use to provision compute nodes.
This IAM role grants Karpenter the necessary permissions to interact with EC2, provision instances, and pull images.
Step 3: Add the Karpenter Helm Repository#
This makes the Karpenter Helm chart available to your cluster.
Step 4: Install Karpenter Using Helm#
Install Karpenter into your Kubernetes cluster with the appropriate values.
Explanation#
- Replace my-cluster with your actual cluster name.
- Use your actual API server endpoint.
- The IAM role should match the one created in Step 2.
Step 5: Create a Karpenter NodePool and NodeClass#
Karpenter requires both a NodePool and a NodeClass resource. Here's an example of each:
NodeClass YAML#
NodePool YAML#
Explanation#
- The AWSNodeClass configures subnet and security group selectors.
- The NodePool defines the constraints for which types of instances can be provisioned, including instance family, capacity type, and availability zones.
Step 6: Apply the Resources#
Step 7: Test the Autoscaler with a Deployment#
Deploy a workload that requires more capacity than your current cluster.
Karpenter will detect that the current cluster does not have enough resources, and it will provision new nodes based on the NodePool constraints.
With these steps, you'll have Karpenter up and running on AWS, automatically scaling your workloads with flexible, intelligent computing provisioning.
Karpenter's NodePools define the constraints and behavior for the nodes that Karpenter can provision
What Are Karpenter NodePools & How Do You Set Them Up?#
Karpenter's NodePools define the constraints and behavior for the nodes that Karpenter can provision. Each NodePool acts as a template for provisioning nodes tailored to specific workload types.
NodePools control attributes such as:
- Instance types
- Availability zones
- Architecture (e.g., amd64 and arm64)
- Taints and labels
- Limits for total CPU and memory usage
- Node expiration behavior using TTL values
Prerequisites for Creating a NodePool#
Before configuring a NodePool with Karpenter, ensure the following prerequisites are met:
- Karpenter is installed and running in your Kubernetes cluster.
- A functioning Kubernetes cluster (e.g., EKS, GKE, or AKS) with workload pods that require Kubernetes autoscaling.
- IAM roles and permissions are properly set up (especially on AWS) to allow Karpenter to provision and terminate compute resources.
- Networking components such as subnets and security groups are tagged and available for use by the autoscaler.
- kubectl is configured to interact with your cluster and has sufficient RBAC privileges to apply custom resource definitions like NodePool.
Once the environment is prepared, you can begin defining NodePools to manage how and when nodes are provisioned.
NodePool Configuration#
Let's walk through a real-world example of how to define a NodePool in Karpenter. This configuration file sets the rules for provisioning nodes that support your application workloads. It includes criteria like instance types, zones, taints, and resource limits.
Once this YAML file is applied, Karpenter will use it as a blueprint when deciding how and where to spin up new nodes to satisfy your cluster's computing demands.
To set up your Karpenter NodePool, use this YAML file:
YAML File Explanation#
- requirements: This section allows you to specify which instance types and availability zones Karpenter should consider when provisioning nodes. In the example above, it restricts provisioning to
m5.largeandm5.xlargeinstances within theus-west-2aandus-west-2bzones. This gives you control over cost, performance, and regional redundancy. - labels: These are applied to all nodes that Karpenter provisions using this
NodePool. Labels likeenv: devhelp in categorizing and selecting nodes for specific workloads. - taints: Taints prevent pods from being scheduled on a node unless the pod explicitly tolerates them. The
NoScheduleeffect means that only pods with matching tolerations for env=dev can be placed on these nodes. This allows for fine-grained placement control. - limits: Sets the maximum cumulative resources (CPU and memory) that can be provisioned by this NodePool. In this case, it restricts Karpenter to spinning up nodes that total no more than 500 vCPUs and 1000Gi of RAM.
- ttlSecondsAfterEmpty: Defines how long a node should stay alive after it becomes empty (i.e., has no pods running). Here, it's set to 300 seconds (5 minutes), helping you reduce cloud costs by removing idle nodes on time. This also filters eligible instance types and zones.
Apply the YAML file using this kubectl command:
NodePools allows you to design infrastructure that matches your workload patterns, cost goals, and reliability needs.
Autoscaling NodePools are ideal when you're running stateless applications, batch jobs, or services with variable demand.
Creating a NodePool for Autoscaling (Step-by-Step Guide)#
Autoscaling NodePools are ideal when you're running stateless applications, batch jobs, or services with variable demand. These pools help manage workloads without manual intervention, making your Kubernetes cluster more cost-effective and responsive.
Step 1: Choose Instance Types and Define Resource Limits#
Start by selecting a few instance types that meet your workload requirements. Use common families like t3, m5, or c5 for general-purpose workloads.
Explanation#
- The
requirementsblock ensures that Karpenter only selects supported zones and instance types. taintsandlabelshelp direct eligible pods to these autoscaling nodes.limitscap how many vCPUs and GiB of memory this pool is allowed to provision.ttlSecondsAfterEmptydefines how long idle nodes will persist before being terminated.
Step 2: Apply the NodePool Manifest#
Save the YAML as autoscaling-pool.yaml and apply it:
Verify it has been created:
Step 3: Create a Workload to Trigger Autoscaling#
Deploy a workload that requires more capacity than is currently available in your cluster. This simulates real autoscaling behavior.
With 20 replicas, the Kubernetes scheduler will place pods until capacity is full. Karpenter detects the pending pods and provisions new nodes according to the autoscaling pool's rules.
Step 4: Add Tolerations to Your Pods#
To allow your pods to run on nodes with specific taints, define tolerations in your deployment spec:
Update your deployment using kubectl apply -f with the updated spec.
Step 5: Monitor Node Provisioning and Scheduling#
Use the following commands to monitor the results:
Also, monitor Karpenter logs:
This ensures that nodes are provisioned and your workloads are scheduled as expected.
Step 6: Clean Up Resources (Optional)#
Once testing is complete, you may want to delete the deployment and NodePool to prevent resource consumption.
This step-by-step setup gives you fine-grained control over how Kubernetes scales under dynamic workloads using Karpenter.
Best Practices for Using Karpenter#
To get the most from Karpenter, consider the following practices:
1. Tag Subnets and Security Groups Correctly#
Karpenter relies on discovery tags to identify which subnets and security groups to use for provisioning. On AWS, make sure your private subnets are tagged appropriately:
Here, the tag karpenter.sh/discovery is essential. Otherwise, Karpenter won't recognize the subnet as eligible.
2. Use Workload-Specific NodePools#
Segment workloads based on their requirements (e.g., GPU workloads, batch jobs, production, and staging, among others). Define separate NodePools for each workload type, applying appropriate taints and labels:
Pods targeting GPU workloads should include matching tolerations and node selectors.
3. Enable Spot Instance Flexibility#
Use Spot capacity for cost-sensitive or interruptible workloads. Add Spot capacity type to NodePool requirements:
Use ttlSecondsUntilExpired in combination with ttlSecondsAfterEmpty to balance cost and availability:
While TTLs are useful for basic lifecycle management, newer versions of Karpenter support more advanced consolidation strategies, such as consolidationPolicy: WhenUnderutilized. This approach intelligently removes underutilized nodes based on real-time usage, making it more suitable for production environments where cost efficiency and resource optimization are critical. Consider using consolidationPolicy instead of, or in addition to, TTLs for more intelligent scaling.
Sample YAML code to implement these two strategies:
4. Set TTLs Strategically#
TTLs determine how long empty or expired nodes should remain in the cluster. Setting these values helps reduce idle compute waste:
Choose longer TTLs for workloads that experience frequent short-lived spikes to prevent churn.
5. Avoid Node Drift with Taints, Labels, and Affinity#
Without guardrails, workloads may land on unintended nodes. Use labels and taints to prevent drift:
And ensure your pods specify matching tolerations:
6. Use Limits to Control Costs#
To avoid runaway provisioning and the exorbitant costs that come with it, define limits for CPU and memory:
Karpenter will not provision nodes that push the total above these limits for the NodePool.
7. Monitor Logs and Events#
Track autoscaling decisions using built-in monitoring. On AWS, use CloudWatch Logs:
Disadvantages and Limitations of Karpenter#
While Karpenter simplifies autoscaling, it's not without trade-offs, such as:
- Still Maturing: As a newer tool, it lacks the long-standing stability of Cluster Autoscaler.
- Cloud Provider Limitations: Non-AWS environments may face bugs or require custom configurations.
- IAM Complexity: AWS integration demands fine-tuned IAM permissions.
- Reactive Scaling: It doesn't support predictive or scheduled autoscaling.
- Learning Curve: YAML-based configuration is flexible but introduces complexity.
- Over-Provisioning Risk: Misconfigured constraints can lead to unnecessary resource usage.
Cross-Platform Support: AWS, Azure, and GKE#
Karpenter on AWS (EKS)#
- Fully supported with mature Helm charts and documentation.
- Utilizes IAM roles for service accounts.
- Can provision Spot and On-Demand EC2 instances.
Karpenter on Azure (AKS)#
- Requires workload identity setup.
- Must manually configure custom resource definitions.
- Some features (like Spot fallback) are in the early stages.
Karpenter on Google Kubernetes Engine (GKE)#
- Less official support than AWS.
- Requires workload identity federation.
- Custom bootstrap scripts are often necessary.
- Still a work in progress for production environments.
For critical workloads, Karpenter on AWS is currently the most reliable and well-supported option.
How Do I Use Karpenter with Google Kubernetes Engine? (Step-by-Step Guide)#
Karpenter has native support for AWS, but it can also be configured to work with Google Kubernetes Engine (GKE). Though not officially supported to the same level as AWS, you can still get it working with some setup steps. GKE users benefit from using Karpenter for flexible, dynamic autoscaling that goes beyond the capabilities of GKE's built-in node autoscaling.
Here's how to set up Karpenter on GKE with detailed steps, configuration, and sample YAML files.
Prerequisites#
- A Google Cloud project with billing enabled.
- The gcloud CLI installed and authenticated.
- Kubernetes CLI (kubectl) configured to interact with your GKE cluster.
- Helm installed for managing Kubernetes applications.
- GKE cluster created with Workload Identity enabled.
- Sufficient IAM permissions to create service accounts, bindings, and roles.
Step 1: Create a GKE Cluster with Workload Identity Enabled#
This enables Karpenter to use a Kubernetes service account that impersonates a Google service account:
In the code snippet above, replace my-project with your actual GCP project ID. This step sets up a GKE cluster with Workload Identity, which allows secure communication between Kubernetes workloads and Google Cloud services without long-lived credentials.
Step 2: Create a Google Service Account (GSA) and Bind IAM Roles#
Karpenter needs permissions to create and delete VMs, manage networking, and access metadata:
This grants the GSA the permissions needed to provision and manage VM instances that serve as Kubernetes nodes.
Step 3: Bind the Google Service Account to a Kubernetes Service Account#
This binds the GSA to the KSA via Workload Identity, allowing Karpenter pods to assume GCP roles.
Step 4: Install Karpenter with Helm#
Create a custom values.yaml file tailored for GKE:
Then run:
Replace <API-SERVER> with your GKE API server's endpoint. This deploys the Karpenter controller using the Workload Identity-aware service account.
Step 5: Create a NodePool and NodeClass for GKE#
NodeClass Example#
Apply both:
These custom resources tell Karpenter how to provision GCE instances that will join your GKE cluster.
Step 6: Deploy a Workload to Trigger Scaling#
If your current cluster lacks enough resources, Karpenter will provision GCE nodes using the NodePool configuration.
With these steps completed, Karpenter should now be dynamically provisioning and scaling nodes in your GKE cluster based on real-time application demand. Use the following kubectl commands to monitor activity and validate the setup:
What Are Some Karpenter Alternatives?#
If Karpenter doesn't meet your needs, consider these alternatives.
Cluster Autoscaler#
This is a Kubernetes component that automatically adjusts the number of nodes in your cluster based on the resource needs of your pods.
It scales up when there are pending pods that can't be scheduled due to insufficient resources and scales down when nodes are underutilized. It's a stable, mature choice for general-purpose autoscaling and integrates well with managed Kubernetes platforms like EKS, GKE, and AKS.
It requires predefined node groups and isn't as flexible as Karpenter in choosing instance types. This tool is ideal for teams using managed Kubernetes services that need predictable scaling behavior and don't require dynamic provisioning logic.

KEDA supports over 50 built-in scalers like Kafka lag, queue length, Prometheus queries, and more
KEDA (Kubernetes Event-Driven Autoscaler)#
An open-source autoscaler designed for event-driven applications that need to scale based on custom metrics or external triggers, KEDA supports over 50 built-in scalers like Kafka lag, queue length, Prometheus queries, and more.
It works alongside the Horizontal Pod Autoscaler (HPA) to scale workloads on demand but doesn't provision infrastructure itself. So it needs to be paired with Karpenter or Cluster Autoscaler for node scaling.
KEDA is ideal for event-driven systems like queue consumers, batch jobs, or microservices responding to system metrics.
GKE Autopilot#
GKE Autopilot is a fully managed Kubernetes mode where Google handles both the control plane and node management.
You simply deploy your workloads and GKE Autopilot automatically provisions, scales, and secures the nodes they run on.
The tool enforces best practices for resource requests and security and charges you based on actual pod resource usage. However, it's GCP-only and may restrict low-level customizations required by certain workloads.
GKE Autopilot is best for GCP-first teams looking to reduce operational burden while benefiting from fully managed Kubernetes scaling.
AWS Fargate#
AWS Fargate is a serverless compute engine for containers that allows you to run pods without managing EC2 instances or Kubernetes nodes.
It automatically provisions resources per pod and scales based on demand, eliminating the need to size and manage infrastructure.
Fargate simplifies operations for stateless or ephemeral workloads, though it may not support certain use cases like DaemonSets or privileged workloads.
AWS Fargate is tightly integrated into the AWS ecosystem and is best suited for stateless apps, bursty workloads, or dev environments that prioritize simplicity over configurability.
How DevZero Can Help#
Many DevZero customers use DevZero along with Karpenter, KEDA and other autoscalers.
Karpenter is specifically a Kubernetes cluster autoscaler focused on node group optimization and management. But as the Datadog State of Cloud Cost report highlighted, over 1/3 of compute cloud waste is the result of idle workloads. Add the waste associated with memory. Let's add to that GPU waste: There's a lot of workloads that provision 8 or 12 GPUs, while actual utilization is less than 1 GPU.
DevZero takes a broader approach to optimization, focusing on:
- Bin packing to reduce the total number of nodes needed
- Request optimization at the workload level to reduce the number of workloads
- Specialized optimization for different workload types (GPU vs CPU)
Key Benefits of DevZero#
- Single multi-cloud platform: support EKS, AKS, GKE and any other type of K8s in a single platform.
- Go beyond scheduling and spot instances: Live migration and binpacking optimizes the number of nodes as well as rightsizing of workloads.
- Live rightsizing for both memory and compute
- Support for any type of compute: Support for CPU and GPU measurement and optimization.
- Flexible policy management: Users can exclude workloads and nodes from optimization, apply changes manually or use a read-write operator for automated optimization.
In summary, the key differentiator appears to be that while Karpenter focuses specifically on node provisioning and scaling, DevZero takes a more comprehensive approach to optimization across the entire Kubernetes cluster to provide additional layers of optimization and cost savings.
Bottom line? DevZero can help you reduce as much as 80% of your Kubernetes cost
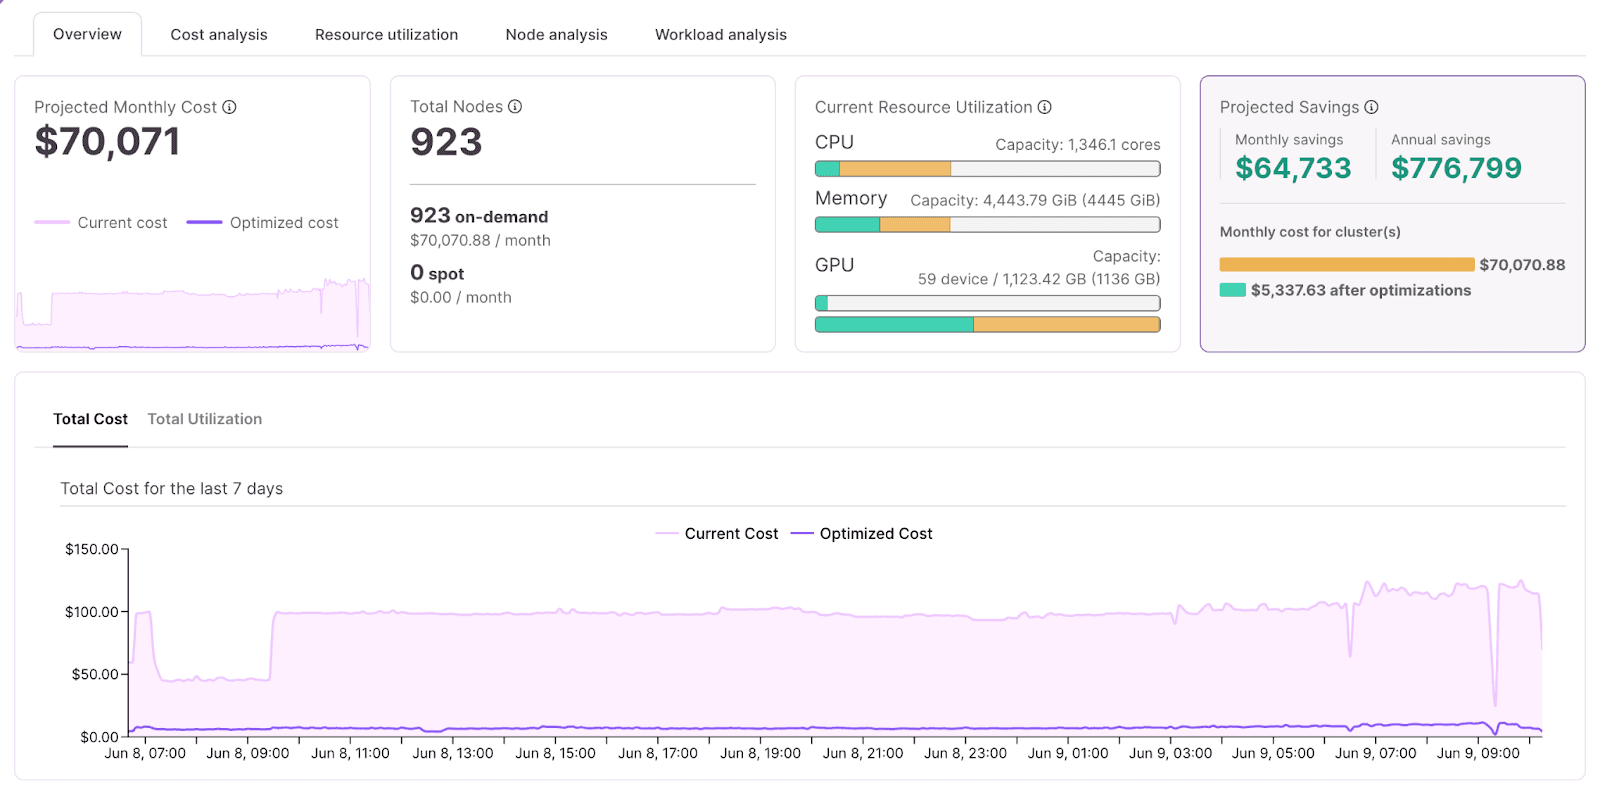
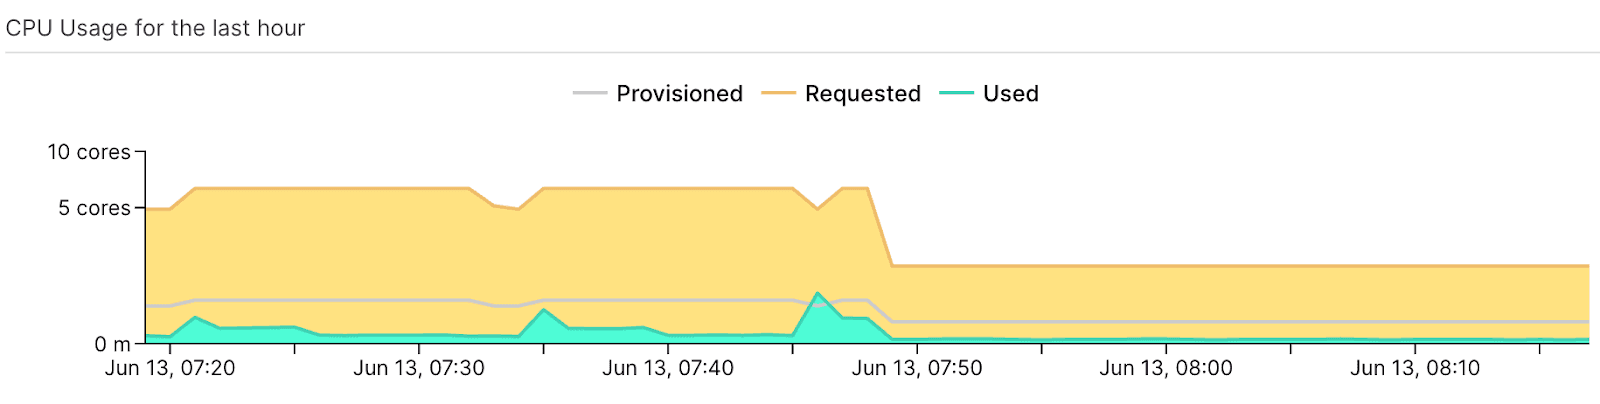
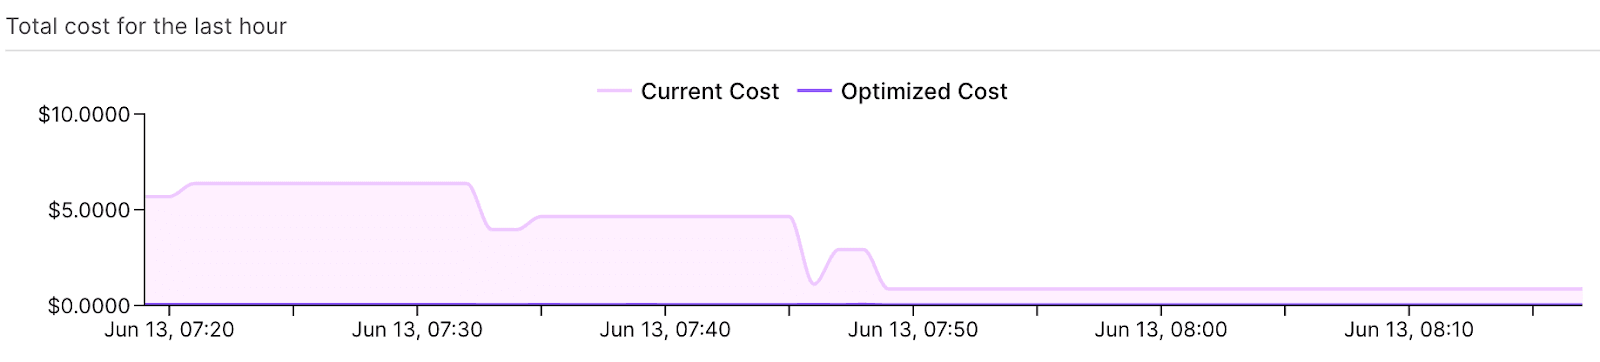
DevZero Dashboards for cost and utilization
Final Thoughts
Karpenter is redefining how Kubernetes clusters scale. With its real-time, right-sized provisioning and growing multi-cloud support, it's a compelling autoscaler for teams seeking agility and efficiency. When combined with developer platforms like DevZero, you unlock both operational excellence and developer productivity. What's not to like?
Explore how DevZero and Karpenter can transform your Kubernetes workflows today.
Bravin Wasike


