EKS Cost Optimization Guide: Best Practices and Tips for 2025

Alberto Grande
Head of Marketing

EKS Cost Optimization Guide: Best Practices and Tips for 2025#
Amazon EKS (Elastic Kubernetes Service) makes running Kubernetes on AWS easier, but keeping costs under control can be a challenge. As your workloads grow, so do the expenses, and without a clear strategy, it’s easy to end up with a sky-high cloud bill.
According to the 2025 State of Cloud Costs by Datadog, over 80% of container spend goes to waste. Most teams over-provision CPU and memory to handle peak loads, but actual usage rarely matches these allocations. This leads to underutilized nodes, inflated infrastructure costs, and inefficient autoscaling.
To optimize EKS costs effectively, you need to understand where your money is going and how to make the most of your resources. In this guide, we’ll break down the key areas of EKS cost management and share practical tips to help you reduce expenses.
Understanding EKS Pricing#
Before optimizing costs, it’s crucial to understand how Amazon EKS charges you. Knowing where your money goes will help you target the right areas for savings.
Here are the main components that make up your EKS costs:
- Control Plane Costs:
- Amazon EKS charges a fixed hourly fee for each Kubernetes cluster you run, typically around $0.10 per hour.
- This cost applies regardless of the number of nodes or workloads running.
- Worker Node Costs:
- Worker nodes are the EC2 instances that power your Kubernetes workloads.
- You pay for the compute capacity of these instances, including both on-demand and spot instances.
- Instance types, sizes, and pricing vary, so it’s essential to choose the right configuration.
- Data Transfer Costs:
- AWS charges for data transferred between Availability Zones (AZs) and between regions.
- Intra-cluster traffic within the same AZ is free, but cross-AZ and cross-region transfers can add up.
- Monitoring data flow is key to keeping these costs down.
- Storage Costs:
- EKS uses Amazon EBS (Elastic Block Store) for persistent storage.
- You’ll incur charges based on the volume size, provisioned IOPS, and snapshots.
- Efficient storage management can help reduce unnecessary expenses.
By breaking down your EKS expenses into these components, you can identify which areas are costing you the most and where optimization efforts should focus.
Understand Your Utilization#
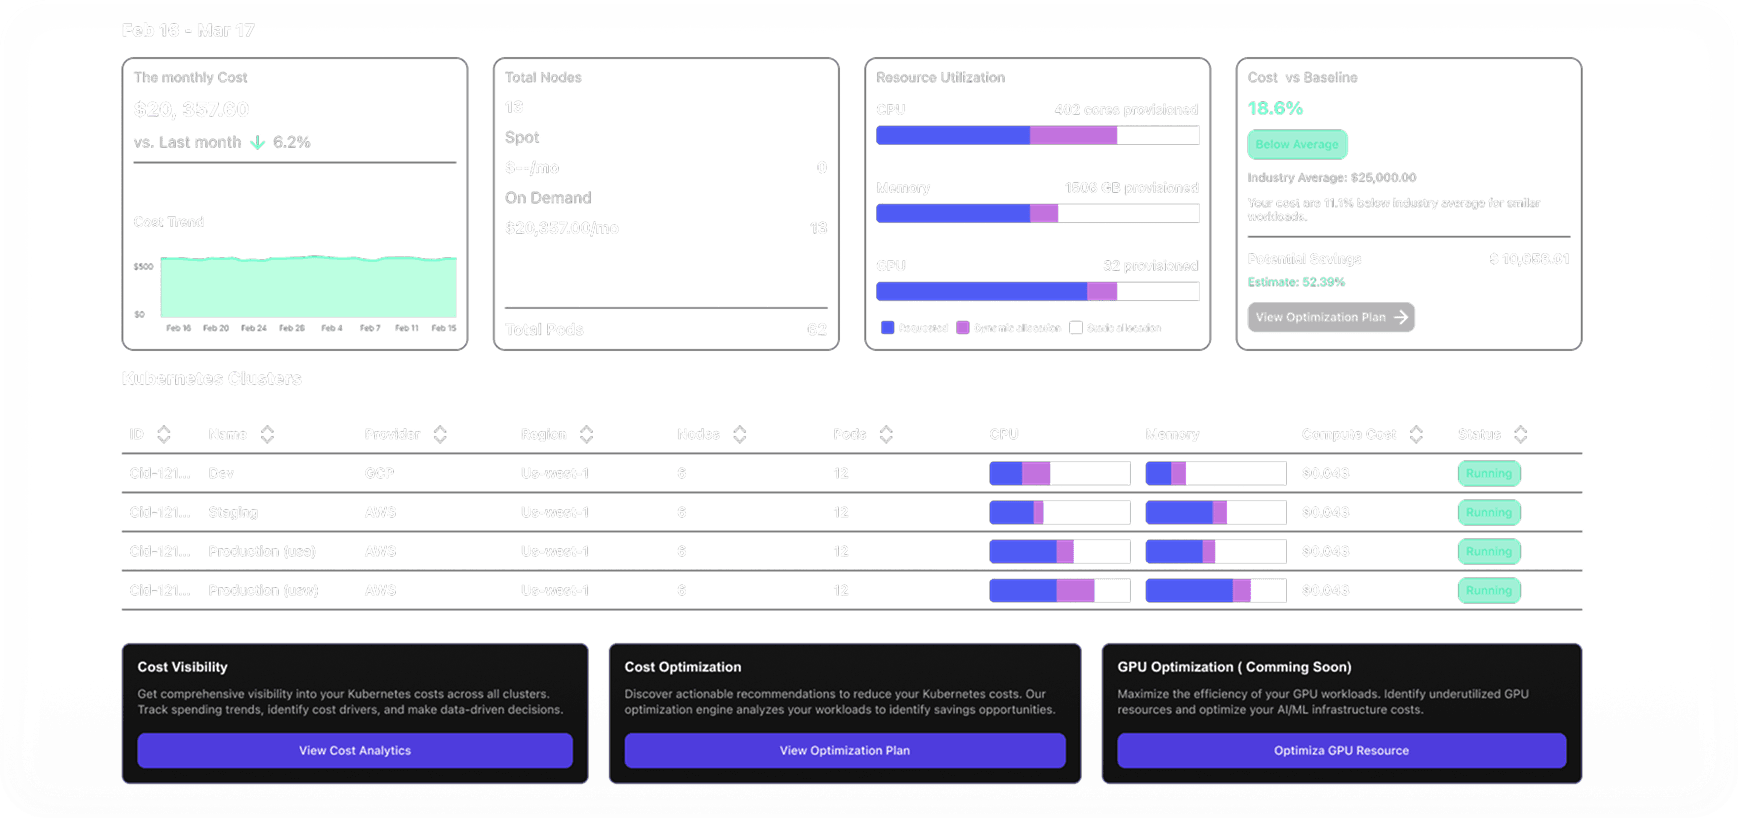
To make informed decisions about cost optimization, you first need to understand how your EKS resources are being used. Tracking metrics helps you spot inefficiencies, identify underutilized resources, and see where you might be overspending. You can either track these metrics manually or streamline the process with a reliable Kubernetes cost monitoring tool.
Here are some essential metrics to monitor when managing EKS costs:
- CPU and Memory Utilization:
- Measure how much of your allocated CPU and memory are actively used.
- Low usage often indicates oversized instances.
- Use AWS CloudWatch to set up alerts for unusual patterns.
- Pod and Node Density:
- Track how efficiently your nodes are utilized.
- Use Kube-state-metrics to assess pod density per node.
- Cluster Autoscaler Events:
- Monitor scale-up and scale-down frequency to spot inefficiencies.
- Frequent scaling may indicate poor configuration.
- Data Transfer Costs:
- Analyze inter-region and cross-AZ data flow.
- Use AWS Cost Explorer to identify clusters generating the most transfer costs.
- Persistent Volume Usage:
- Check for over-provisioned or unused volumes.
- Use Amazon EBS Volume Manager for better cost tracking.
- Idle Resources:
- Identify nodes running with minimal workloads.
- Schedule non-critical tasks for off-peak hours.
Key EKS Cost Optimization Strategies#
To keep your EKS costs under control, it’s crucial to implement strategies that match your workload requirements while minimizing waste. From instance selection to resource management, optimizing your setup can lead to significant savings.
Optimize Instance Selection#
Choosing the right instances is one of the most effective ways to reduce EKS costs. AWS offers a wide range of instance types, and selecting the optimal configuration can significantly lower expenses.
Best Practices for Instance Selection
- Match Instance Types to Workloads:
- Use compute-optimized instances for CPU-heavy tasks and memory-optimized instances for data-intensive applications.
- For workloads with variable usage, consider burstable instances (T3, T4g) to save on costs during idle periods.
- Leverage Savings Plans and Reserved Instances:
- For predictable workloads, commit to AWS Savings Plans or Reserved Instances (RIs) to save up to 72% compared to on-demand pricing.
- Analyze your long-term needs and select a plan that aligns with your usage patterns.
- Use Spot Instances for Non-Critical Tasks:
- Spot instances can reduce costs by up to 90% compared to on-demand instances.
- Use them for batch jobs, testing, and workloads that can tolerate interruptions.
- Mix and Match Instances:
- Combine different instance types within your cluster to optimize for both performance and cost.
- Use node taints and tolerations to ensure workloads are assigned to the appropriate instances.
⚠️ Note: in a small cluster, using different types of nodes for different workloads can make it harder to pack efficiently, since workloads only run on specific node types. It’s usually better to use fewer node types to improve binpacking. In a large cluster, workload distribution tends to balance out. But in a 10-node cluster split across 5 node types (2 nodes each), you can end up with suboptimal utilization—especially if all workloads could fit into just 3 nodes.
Use Spot Instances Effectively#
Spot instances offer significant cost savings compared to on-demand instances, making them a great choice for non-critical or fault-tolerant workloads. They are especially useful during peak times when on-demand instances become more expensive.
Best Practices for Using Spot Instances
- Identify Suitable Workloads:
- Use spot instances for batch processing, data analysis, CI/CD jobs, and other tasks that can handle interruptions.
- Avoid using them for critical production services that require high availability.
- Set Up Spot Instance Draining:
- Configure your EKS cluster to gracefully drain spot instances before AWS reclaims them.
- Use Spot Instance Termination Notices and integrate with the Cluster Autoscaler to manage capacity changes.
- Diversify Instance Types:
- Increase availability by allowing multiple instance types in your Spot Fleet.
- Use Instance Flexibility to reduce the risk of spot interruptions.
- Leverage Spot Instance Pools:
- Use multiple spot instance pools within an Auto Scaling Group (ASG) to balance availability and cost.
- AWS recommends spreading your requests across pools to reduce the chance of interruption.
- Monitor Pricing and Availability:
- Use AWS Spot Instance Advisor to get insights into historical prices and interruption rates.
- Automate instance selection based on price trends to maximize savings.
Right-Size Your Workloads#
One of the most common sources of wasted spend in EKS is over-provisioned resources. Right-sizing your workloads ensures that your applications use only the necessary CPU and memory, reducing unnecessary costs.
Best Practices for Right-Sizing
- Monitor Resource Utilization:
- Use AWS CloudWatch and Kubernetes Metrics Server to track CPU and memory usage at the pod level.
- Identify workloads that consistently use less than the allocated resources.
- Adjust Resource Requests and Limits:
- Set resource requests to match the average usage and limits to handle peak demands.
- Avoid setting unnecessarily high limits, which can lead to over-provisioning.
- Use Vertical Pod Autoscaler (VPA):
- Automate the adjustment of CPU and memory requests based on actual usage patterns.
- VPA can help right-size your pods dynamically, avoiding both over-allocation and resource starvation.
Right-sizing not only helps control costs but also improves application performance by allocating resources more efficiently.
Implement Autoscaling Best Practices#
Autoscaling is essential for keeping your EKS cluster efficient and cost-effective. By dynamically adjusting resources based on demand, you can avoid both over-provisioning and resource shortages.
Best Practices for Autoscaling
- Use Cluster Autoscaler for Node Scaling:
- Automatically adjusts the number of nodes in your cluster based on pod demand.
- Configuring the autoscaler correctly helps maintain optimal resource allocation without manual intervention.
- Enable Horizontal Pod Autoscaler (HPA):
- Scales the number of pod replicas based on CPU or custom metrics.
- Ideal for applications with variable workloads, such as web servers or API gateways.
- Combine HPA and VPA Carefully:
- While HPA adjusts the number of pods, VPA modifies the resource requests of individual pods.
- Use them together only when workloads have both fluctuating demands and varying resource needs.
- Set Up Autoscaling Policies:
- Define policies to avoid excessive scaling during temporary load spikes.
- Use cool-down periods to stabilize your environment after scaling events.
- Monitor Autoscaler Performance:
- Track scaling events and monitor the response time of your cluster to demand changes.
- Identify bottlenecks where scaling lags behind usage spikes.
Optimize Resource Requests and Limits#
Setting the right resource requests and limits in Kubernetes ensures that your applications have enough capacity without over-provisioning. Misconfigurations can lead to higher costs and inefficient use of your cluster.
Best Practices for Resource Optimization:
- Audit Resource Requests Regularly:
- Use kubectl and monitoring tools to check current CPU and memory requests.
- Identify workloads with excessive allocations compared to their actual usage.
- Set Realistic Requests and Limits:
- Avoid setting CPU and memory requests too high, as this reserves unnecessary capacity.
- Set limits only where needed to prevent resource hogging by individual pods.
- Profile Workloads with Real Data:
- Use tools like Prometheus and Grafana to visualize resource utilization over time.
- Adjust requests based on consistent patterns rather than short-term spikes.
- Use Resource Quotas:
- Implement namespace-level quotas to prevent teams from consuming more resources than necessary.
- Enforcing quotas helps maintain a balanced and cost-efficient cluster.
- Leverage Limit Ranges:
- Define minimum and maximum resource limits at the namespace level.
- Helps maintain consistent resource usage across multiple applications.
Fine-tuning resource requests and limits not only improves cost efficiency but also helps prevent performance issues caused by resource contention.
Schedule Non-Critical Workloads#
Running non-essential tasks during peak hours can drive up costs, especially when using on-demand instances. Scheduling these workloads during off-peak times helps reduce expenses without impacting critical services.
Best Practices for Scheduling:
- Leverage Kubernetes CronJobs:
- Schedule batch processing, backups, and other non-urgent tasks to run during low-traffic periods.
- Use CronJob resources to automate routine tasks efficiently.
- Time-Based Pod Scheduling:
- Implement time-based policies to start or stop non-critical pods based on usage patterns.
- Combine with Horizontal Pod Autoscaler (HPA) to ensure flexibility during unexpected spikes.
- Automate with AWS EventBridge:
- Integrate EventBridge with EKS to trigger workloads based on predefined schedules.
- Ideal for tasks that only need to run once a day or during specific maintenance windows.
- Tag Non-Critical Resources:
- Clearly label non-essential workloads, making it easier to identify and manage them.
- Apply resource policies that align with their importance, such as using spot instances.
- Monitor Idle Time:
- Set up alerts for workloads that stay idle for long periods.
- Use AWS Cost Explorer to track usage patterns and optimize scheduling.
Monitor and Manage Resource Usage#
Keeping a close eye on your resource utilization is key to maintaining cost efficiency in EKS. Regular monitoring helps you identify cost drivers, detect anomalies, and make data-driven adjustments to your cluster.
Best Practices for Monitoring and Management
- Use AWS CloudWatch for Metrics:
- Set up dashboards to track CPU, memory, and network usage across your cluster.
- Create alarms to notify you of unexpected spikes or resource exhaustion.
- Leverage Cost Explorer for Spending Insights:
- Break down costs by service, cluster, and workload.
- Identify which EKS components are the most expensive and why.
- Deploy Prometheus and Grafana:
- Use Prometheus to collect detailed metrics from your EKS cluster.
- Visualize trends with Grafana dashboards to spot inefficiencies over time.
- Set Up Automated Cost Reports:
- Automate weekly or monthly reports to track changes in spending.
- Highlight areas where costs have increased or decreased unexpectedly.
- Implement Anomaly Detection:
- Use AWS Cost Anomaly Detection to identify unusual spending patterns.
- Set up alerts to respond quickly to unexpected cost increases.
- Regularly Audit Unused Resources:
- Identify idle nodes, orphaned volumes, or outdated snapshots.
- Decommission resources that are no longer needed to reduce waste.
Automate Cost Optimization#
Managing EKS costs manually can be complex and time-consuming. Automating routine optimization tasks helps maintain efficiency and reduces the risk of human error. You can use native EKS tools, but it’s often more effective to rely on a Kubernetes cost optimization tool to automate monitoring and adjustments.
Best Practices for Automation Using Native EKS Tools
- Enable Cluster Autoscaler:
- Automatically adjusts the number of nodes in your cluster based on pod demand.
- Ideal for maintaining the right capacity without over-provisioning.
- Use Horizontal Pod Autoscaler (HPA):
- Scales the number of pod replicas based on CPU, memory, or custom metrics.
- Ensures workloads adapt to varying traffic without manual intervention.
- Automate Resource Tagging:
- Use AWS tags to categorize resources by project, team, or environment.
- Set up automated scripts to tag resources as they are created, improving cost allocation visibility.
- Set Up Automated Cleanup with AWS Lambda:
- Create Lambda functions to detect and terminate idle or orphaned resources.
- Automate the removal of unused volumes, outdated snapshots, or untagged instances.
- Automate Cost Monitoring:
- Use AWS Budgets to set spending limits and receive alerts when you approach them.
- Automate cost reports using AWS Cost Explorer, generating regular updates on your cluster’s expenditure.
- Automate Data Collection:
- Integrate AWS CloudWatch with EKS for automated metric collection and anomaly detection.
- Set up dashboards to continuously monitor resource utilization and cost trends.
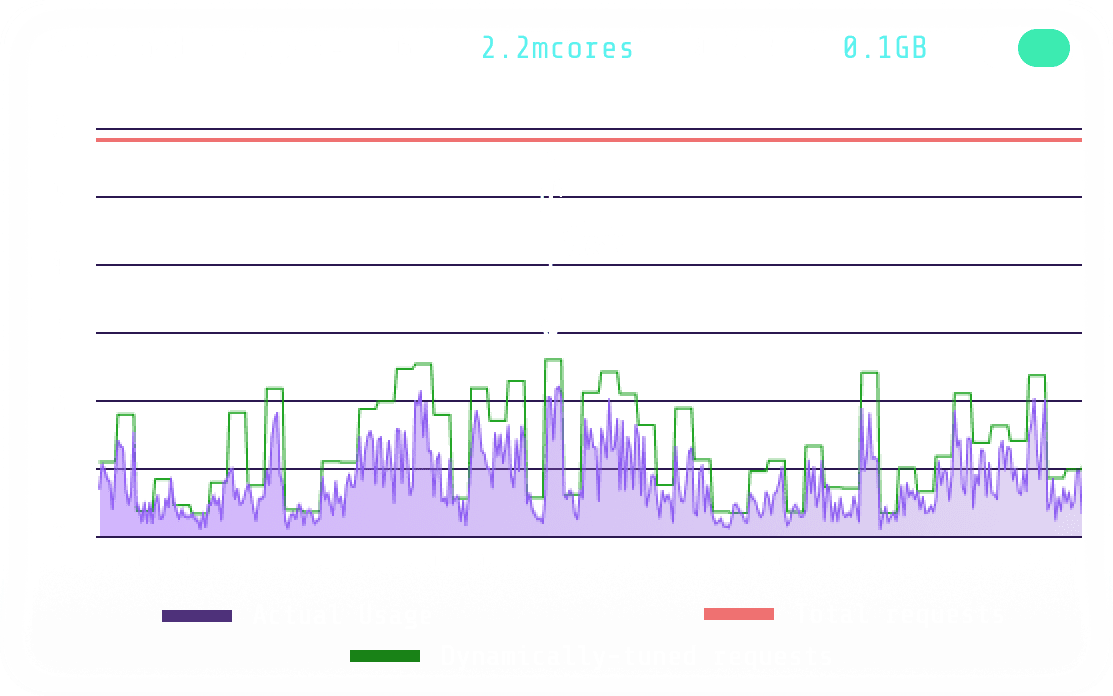
DevZero’s Solution: Live, Dynamic Optimization#
DevZero addresses this challenge with live, dynamic optimization. It continuously monitors container behavior and makes real-time adjustments to resource requests and cluster nodes, eliminating waste without restarting workloads or impacting performance. This automated approach ensures that your clusters stay efficient, regardless of changing workload patterns.
How DevZero Optimizes Your EKS Costs
- Live Rightsizing:
- Realtime CPU and memory requests tuning for all workloads.
- Enhances and complements existing autoscalers by fine-tuning resource allocations.
- Works seamlessly without restarts or disruptions to running applications.
- Live Migration:
- Moves workloads across nodes using snapshot and restore.
- Keeps services running smoothly, even when reallocating resources.
- Binpacking:
- Consolidates resized workloads into fewer nodes to maximize node utilization.
- Reduces the number of idle nodes by efficiently packing containers.
- Spot-Aware Scheduling:
- Automatically leverages spot instances when available.
- Uses the most cost-effective instances while maintaining stability.
- Instance Type Optimization:
- Selects ideal VM types based on workload shape and behavior.
- Dynamically adapts to changes in demand, preventing over-provisioning.
With DevZero’s dynamic and automated approach, users typically see a 40%–60% reduction in Kubernetes infrastructure costs. Get started with the platform’s observability-first rollout, allowing teams to assess impact before automating changes, making the transition smooth and risk-free.

Alberto Grande
Head of Marketing


